
בחירת המיקום הנכון ללוח הכביסה המותקן לקיר
הערכה של מבנה הקיר והקיבולת העומסית שלו
לפני הצבת לוח כביסה, קבעו תחילה את התומכות העץ המוצקות בעזרת מוצא תומכות באיכות טובה. גבס רגיל לא יחזיק את המשקל הנורמלי בשימוש רגיל, ולכן חיבור ישיר לתומכות מבטיח יציבות ומניעת הפתעות לא נעימות כאשר הלוח מתחיל להתרגל. בדקו גם את ההנחיות של היצרן בנוגע למגבלות המשקל – רוב הלוחות יכולים לשאת בין 25 ל-50 פאונד, אך אל תשכחו את הלחץ הנוסף שמופעל בעת כביסת הבגדים. אם אתם עובדים על קירות בטון, השתמשו בעוגנים מיוחדים המיועדים למשימות כבדות – לפחות 75 פאונד או יותר. סרקו את הקיר באופן מקיף כדי לאתר צינורות או כבלים נסתרים לפני החידוד, ומכונה רב-חישה איכותית יכולה לספק הבדל מהותי בשלב זה. חשוב מאוד לבצע זאת כראוי: מחקרים בנושא בטיחות מראים שתקינה נכונה מצמצמת את הבעיות בהסרה בקרוב לשלושה רבעים לעומת אנשים שמדלגים על שלבים בסיסיים אלו.
מדידת מרחקי שחרור, גובה ודרישות הגעה ארגונומיות
השאירו כ-100–122 ס"מ של רוחב אנכי כדי שהציוד יוכל להתפשט לחלוטין ללא מגע בתקרת החדר. התקינו את התומך בגובה שבין מותן לירך, כלומר כ-81–97 ס"מ מעל הרצפה, מה שמאפשר לשמור על עמדת עמידה טבעית. בעת בדיקת המרחק הנדרש בזמן עמידה, ודאו שהמרפק מקופל בזווית של כ-90 מעלות כאשר היד נוגעת בפני הלוח. יש להבטיח לפחות 61 ס"מ של מרחב פתוח מלפני הלוח כדי לאפשר תנועה גופנית מתאימה במהלך ההפעלה. אל תשכחו גם את הרווח הצידי – השאירו כ-91 ס"מ זמינים לעבודה נוחה בבגדים. אנשים שמתקינים את המערכת בהתאם להנחיות אלו דיווחו על ירידה משמעותית בכאבי גב לאורך זמן. מחקרים מראים שעובדים דיווחו על תחושת עייפות נמוכה ב-67 אחוז לאחר יישום עקבי של המלצות המרחקים הללו לאורך יום העבודה.
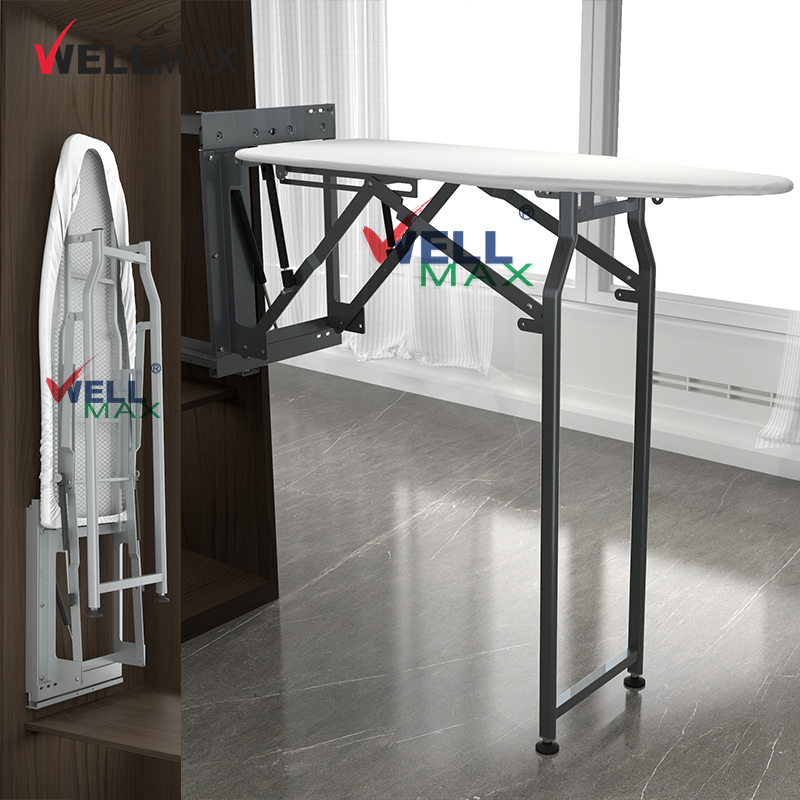
התקנה צעד אחר צעד של לוח כביסה מותקן לקיר
איתור קורות והכנה לפני התקנת התומך
הריצו מוצא מסמרים לאורך שטח הקיר כדי לאתר את המסגרת העץ המוסתרת מאחוריו של הגבס. ודאו שסימנתם בבירור כל נקודת מרכז של המסמרים, מכיוון שתלייה של עצמים רק בגבס עלול להוביל לנטיה או אפילו לנפילה בשלב מאוחר יותר. צרו מקום סביב האזור שבו אנו מתכוונים להתקין את הפריטים הללו, לפחות ארבע רגל (כ-1.2 מטר) מכל כיוון, אם אפשר. הסירו כל תמונות או דקורציות מאותו אזור ונקו את הקירות היטב. קחו רמת לייזר כדי לבדוק האם הקיר ישר באמת. לעיתים קירות אינם שטוחים לחלוטין, ולכן ייתכן שנידרש להשתמש במקבילים עציים קטנים כדי לדייק את היציבה. לפני חישוק כל חור, עיינו בתוכניות ישנות אם הן זמינות, או בצעו סריקה נוספת באמצעות גלאי משופר שמביא גם צינורות מים וגם תיירים בתוך הקירות. בטיחות היא עדיפה על סיכון כשמדובר בהימנעות מ תאונות במהלך ההתקנה.
Фиксציה של התומך והחיבור של יחידת הלוח לכביסה
התקינו את המסגרת כך שהקצה העליון שלה יהיה בגובה של 52–57 אינץ' מעל הרצפה. גובה זה מתאים ביותר לרוב האנשים בעת נגיעה כלפי מעלה, אך עדיין מאפשר ללוח הכביסה להתרחב במלואו ללא התנגשות באובייקטים אחרים. ודאו שקודחים חורים מדריכים בגודל 1/8 אינץ' דרך המסגרת ישירות למרכז כל עמוד תומך. בעת התחברות באמצעות ברגים מסוג #10 (Lag screws), יש להכניסם לפחות 2.5 אינץ' לתוך העמוד ולהדק אותם בסדר אלכסוני על פני המסגרת כדי לחלק באופן אחיד את המתח. לאחר ההתקנה, משכו חזק כלפי מטה את כל המערכת כדי לבדוק אם קיימת רעידה או ריפוד. כעת הזיזו את לוח הכביסה עצמו לכיוון המסגרת עד שסיכות הנעילה הקטנות תקפוץ למקום עם צלצול ברור ומרגש. מנגנון הבטיחות חייב לפעול כראוי בהתאם לסטנדרטים התעשייתיים ליציבות ולגנת המשתמש.
אימות הבטיחות, היציבות והפונקציונליות לאחר ההתקנה
בדיקת פעולת הקיפול-למטה, מנגנון הנעילה והתאמות לתקן ASTM F2057-23
נסו לקפל ולפרוש את הקרש במלואו כעשר פעמים רק כדי לראות אם הוא זז בצורה חלקה בכל פעם. לא אמורות להיות נקודות דבקות או מקומות שבהם קשה מדי להזיז אותו. ודאו שהמנעול נכנס למקומו בקליקה כאשר הקרש פתוח וסגור. לחצו בחוזקה על החלק הקדמי עם משקל של כ-20 קילוגרמים כדי לחקות את מה שקורה בגיהוץ רגיל. המשטח צריך להישאר יציב מבלי לזוז או להתרופף כלל. על פי ASTM F2057-23, המכסה תקני בטיחות לציוד אחסון בגדים, כל המוצר צריך להתמודד עם לחץ מסוג זה מבלי ליפול או שחלקים יתנתקו. אל תשכחו לבחון היטב את כל חלקי המתכת המחזיקים את הכל יחד לאיתור סדקים או כיפופים. ביצוע בדיקות אלו מבטיח שתחנת הגיהוץ תישאר יציבה ותפעל כראוי יום אחר יום.
טעויות נפוצות שעליהן יש להימנע בעת התקנת לוח כביסה מותקן לקיר
התקנת לוח כביסה מותקן לקיר דורשת דיוק כדי למנוע סיכונים לביטחון ותקלות בתפעול. טעויות נפוצות כוללות:
- התעלמות ממפרעים קרובים : התקנה בקרבת ארון או שולחן מגבילה את הפעלת הלוח. יש להבטיח זווית סיבוב חופשית של לפחות 120°.
- פגיעה בשלמות המבנית : התקנה רק על גבס-בורד – ולא לתוך עמודי עץ או מתכת – עלולה לגרום לקריסה תחת עומסים טיפוסיים של כביסה (עד 150 פאונד). יש תמיד להשתמש בתבניות שסופקו על ידי היצרן כדי להתאים את ההתקנה לעמודי התמיכה.
- התעלמות מהגדרות החשמל : מכבשים צורכים 1,200–1,800 וואט. כדי להימנע מעומס יתר על המעגל, יש להתקין אותם על מעגל ייחודי של 20 אמפר, אם אפשר.
- דילוג על מבחני יציבות : דילוג על האימות שלאחר ההתקנה של מנגנוני הנעילה והתפלגות המשקל מגביר את הסיכון להתהפכות. אי התאמה стандארט ASTM F2057-23 מגבירה סיכון זה ב-70%, לפי ועדת הביטחון של מוצרים לצרכן (2023).
התקנה מקצועית מפחיתה שגיאות אלו ב-90%, לפי קבלנים בתחום שיפוצי בתים. יש תמיד לוודא שהגובה מהרצפה ללוח הכביסה נמצא בתוך הטווח הסטנדרטי של התעשייה – 34–38 אינץ' – כדי להשיג את הארגונומיה האופטימלית.
שאלות נפוצות
למה אני צריך לאתר עמודי עץ מסוליד להתקנה?
עמודי עץ מסוליד מספקים את התמיכה הדרושה למשקל וללחץ המופעלים על לוח הכביסה, ומניעים נטיה או התנתקות מהקיר.
מה הגובה המומלץ למסגרת ההתקנה?
המסגרת חייבת להיות בגובה של 52–57 אינץ' מעל הרצפה, כדי לאפשר לפרוש את לוח הכביסה כראוי ללא התנגשות באובייקטים אחרים.
איך אפשר לבדוק את יציבות לוח הכביסה?
לכפל ולפרוס את הלוח מספר פעמים, וללחוץ עליו בכוח עם משקל של כ-50 פאונד, כדי להבטיח שהוא נשאר יציב ולא זז או מתנתק.